The Office 365 email encryption service has been around for a long time. I can still recall doing some configurations for a predecessor to this service back when it used to be called Exchange Hosted Encryption! For the most part, the core encryption service has not changed all that much in the sense that the service still provides the same function, namely, to encrypt emails with sensitive content (along with any attachments). What I felt was worthy enough to share is a change in how to trigger the encryption process (call it more user friendly).
Requirements
In order to use the Office 365 Message Encryption service, you will need to obtain the correct license, Azure Information Protection (Plan 1 or Plan 2). This license comes bundled in the Enterprise E3 and E5 subscriptions, it can also be added as an add-on to the Business licenses.
Old Trigger Method
Previous to the changes made by Microsoft, to encrypt an email, you would have had to enter a keyword trigger into the subject of the email, something like Secure: or Encrypt:. Other options existed to trigger the encryption as well (i.e. setting the sensitivity flag), but subject keyword was our favored approach. While admittedly not hard to enter, we have seen many an issue where sensitive information went out that should have been encrypted. There were deployments where we had to extend out the Data Loss Prevention (DLP) service to auto-encrypt messages matching certain criteria (iie. credit card, bank number, etc.). This older method is still available to use and has not been removed.
New Trigger Method
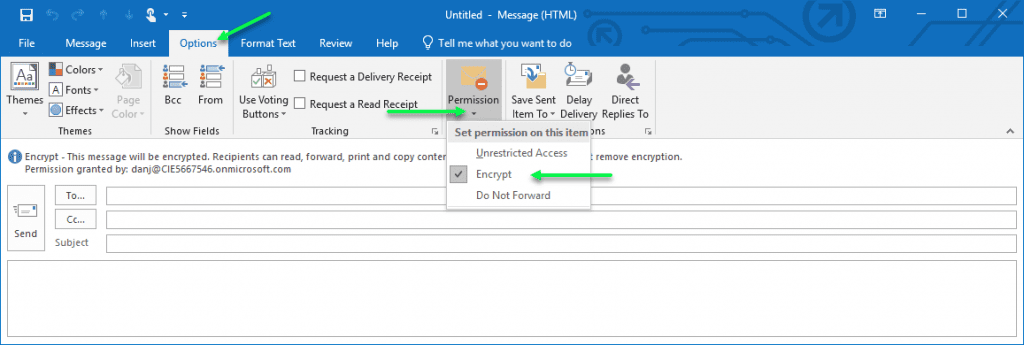
With the changes made by Microsoft, to encrypt an email, it is a simple matter of clicking a few buttons. In an email message, under the Options tab, click on the Permission button and select the Encrypt option. That’s it!.
Tip: To those Office savvy folks who know how to customize the ribbon bar, you can make the Encrypt button visible on the Message tab.
In Outlook:

In Outlook Web App:

A couple of bonus items for us well as well:
- This method also produces a message tip explaining that the email will be encrypted as well as outlining the restrictions on the message (this is something the old method did not do).
- There are also other message restriction items that get exposed through this option. Refer to the Outlook screenshot, you can see a “Do Not Forward” option as well. With Azure Information Protection, you can offer a variety of message classifications that can be published (How about a policy that the email can’t be sent outside the company?)
There are lots of options available with the Azure Information Protection license; email encryption is just one of the services.
If you are interested in capabilities and want to know more, please reach out to a Sikich representative.
This publication contains general information only and Sikich is not, by means of this publication, rendering accounting, business, financial, investment, legal, tax, or any other professional advice or services. This publication is not a substitute for such professional advice or services, nor should you use it as a basis for any decision, action or omission that may affect you or your business. Before making any decision, taking any action or omitting an action that may affect you or your business, you should consult a qualified professional advisor. In addition, this publication may contain certain content generated by an artificial intelligence (AI) language model. You acknowledge that Sikich shall not be responsible for any loss sustained by you or any person who relies on this publication.


