This website uses cookies so that we can provide you with the best user experience possible. Cookie information is stored in your browser and performs functions such as recognising you when you return to our website and helping our team to understand which sections of the website you find most interesting and useful.
NetSuite’s Bank Reconciliation Improvements in New Release 2020.1

As Bank Reconciliations continue to be a pain point for customers, NetSuite has placed a large emphasis on recent new releases to improve this process as much as possible for end users. These enhancements include taking strides to automate as much of this process as possible and then to update different labels and navigational paths for a more intuitive user experience. In this blog, we will cover the NetSuite bank reconciliation improvements to its process and its new enhancements to ensure you are utilizing the system to its fullest potential and, in turn, cutting down on time it takes to reconcile your bank account in NetSuite.
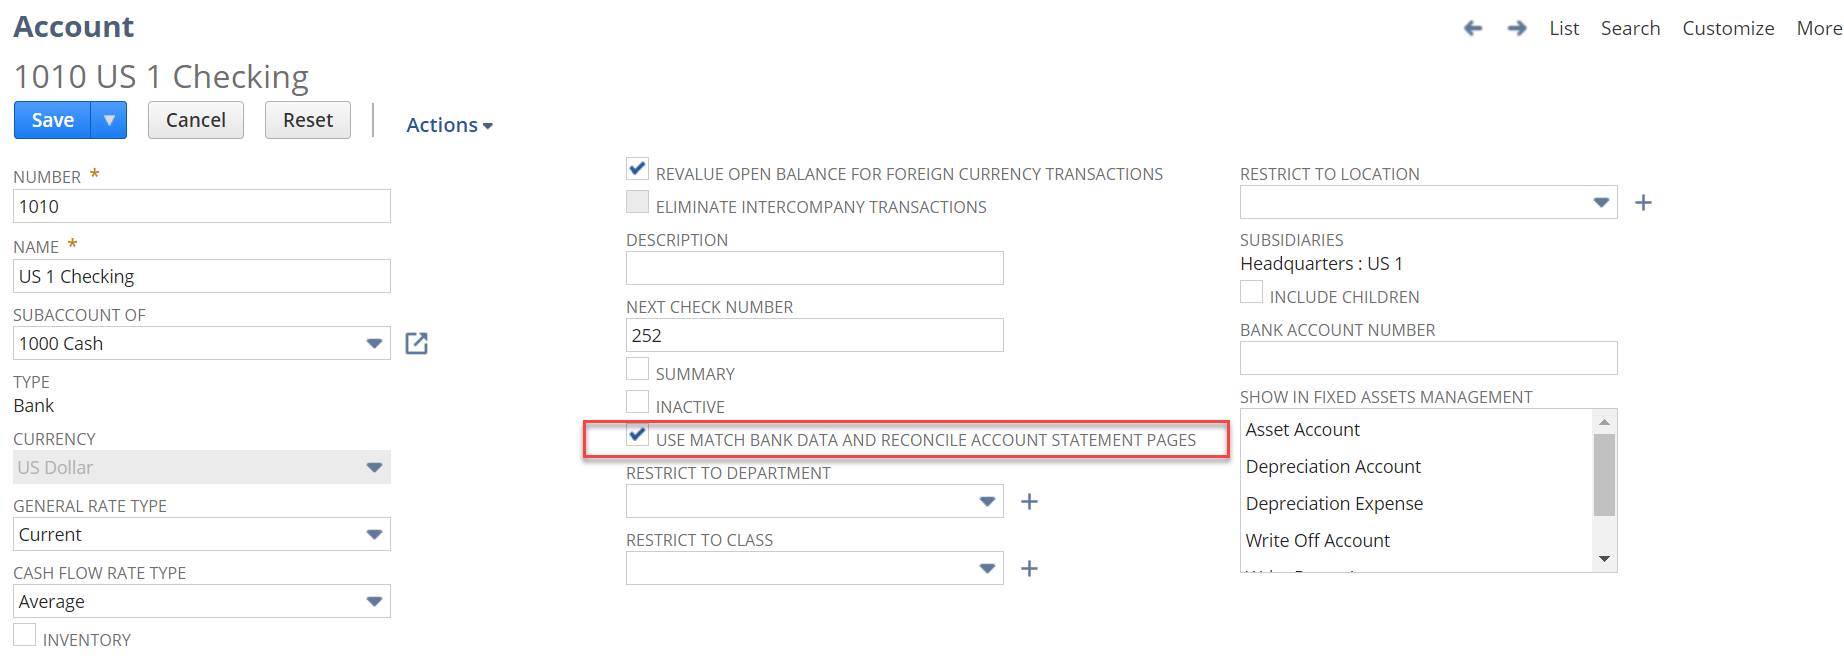
NetSuite still supports both a manual reconciliation and an automated reconciliation process. To utilize NetSuite’s automated and newest enhancements, users will need to enable these features for each bank account in which they wish to use this process. This can be done by creating or editing an existing bank account and selecting the “USE MATCH BANK DATA AND RECONCILE ACCOUNT STATEMENT PAGES” checkbox.

After this enabling this feature, users can move forward with their bank reconciliation by choosing to either manually import their bank statements into NetSuite or to set up an automated import process via Bank Feeds or the new Financial Institution Connectivity API. Please see our previous post regarding the NetSuite bank feeds for further details on the automated bank statement process.
Reconcile a bank statement online
Prior to 2020.1, to manually import your bank statement, users would navigate to the “Import Online Banking Data” page. NetSuite has updated the name of the page to “Upload File,” but the location and functionality around this record remain the same.
Once you bring a bank file into NetSuite, the intelligent transaction matching feature will try and match as many transactions as possible between what was brought in via the bank statement and the existing general ledger transactions in NetSuite.
To review these transactions, users can follow the navigation hyperlinks from the file upload status page or navigate to the “Match Bank Data” page. This page was previously titled “Confirm Transaction Matches,” but again, the location and functionality remain intact.
Once in the “Match Bank Data” page, users will notice a cleaner looking page and some additional fields and capabilities that will enhance the user’s experience.

Some key differences to call out include, hyperlinks to related bank reconciliation pages (a.), real-time view into your bank account’s balance as well as the ability to update your bank statement information (b.), workflow and label improvements (c.), the ability to exclude transactions from the bank reconsolidation page (d.), and finally the ability to resize and reorder the different transaction columns (e.).
NetSuite has renamed the previous “Unmatched” subtab to “To be Matched” for all data that requires manual matching. Once transactions have been matched, users will notice that the previously labeled “Review Matches” subtab is now “Matches to Submit” Finally, to avoid previous confusion, the “Confirm Transaction Matches” button is now “Submit.” After applicable transactions have been matched, users will hit this button to submit the matches for reconciliation (c.).
Another enhancement to the “Match Data” page includes the ability to exclude transactions. Users can now use this feature to remove transactions that may be old or duplicative, so they will not be shown on the matching page. These excluded transactions can be re-added to the matching page at any point (d.).
Finally, NetSuite has responded to the request to customize the different transaction columns. Users now have the ability to resize column widths and reorder columns to suit needs better. In the screenshot above, one can see that the “Amount” columns have been moved next to each other for easier matching (e.).
Once all transactions have been matched, users can continue to fully reconcile their bank statements by navigating to the “Reconcile Account Statement” page either through the hyperlink in the “Match Bank Data” page (previous screenshot – a.) or via their previous navigational paths.

Once in the “Reconcile Account Statement” page, users will recognize a familiar page with a few small enhancements. The first being the change of the previously labeled “Close Statement” button to the intuitive “Reconcile” button (a.). Once applicable transactions are selected and the “Ending Statement Balance” value has been populated this button will be available for selection. One might notice that the previously labeled button “Confirm Transaction Matches” is no longer visible. NetSuite has added this navigation path to their “More” hyperlink to group it to other related reconciliation pages (b.).
We hope you find this update guide helpful in your next bank reconciliation in NetSuite. Please reach out to Sikich with any questions around NetSuite bank reconciliation improvements, as they continue to make enhancements to improve your user experience.
This publication contains general information only and Sikich is not, by means of this publication, rendering accounting, business, financial, investment, legal, tax, or any other professional advice or services. This publication is not a substitute for such professional advice or services, nor should you use it as a basis for any decision, action or omission that may affect you or your business. Before making any decision, taking any action or omitting an action that may affect you or your business, you should consult a qualified professional advisor. In addition, this publication may contain certain content generated by an artificial intelligence (AI) language model. You acknowledge that Sikich shall not be responsible for any loss sustained by you or any person who relies on this publication.


