This website uses cookies so that we can provide you with the best user experience possible. Cookie information is stored in your browser and performs functions such as recognising you when you return to our website and helping our team to understand which sections of the website you find most interesting and useful.
How to create statistical schedules in NetSuite to automate Dynamic Allocations

Statistical schedules in NetSuite allow you to automate your statistical journal entries on a schedule basis. Once you have a schedule set up, you can determine the frequency (monthly, quarterly, etc.) of how often you want your statistical account(s) updated. This will allow you to automatically have the right count in your statistical account without any manual update. In order for the schedule to work, you will need to create a saved search to accurately count the number of data by either class, department or location.
Here is how to create statistical schedules in NetSuite:
Step 1) Create the right Units of Measure Ex: Headcount.
This is a mandatory step so the system knows what units the statistical account will be tied too.
- Lists > Accounting > Units of Measure > New
- If using Headcount, populate the necessary fields with a base unit conversion rate of 1

Step 2) Create a Statistical Account
(Statistical accounts are non-monetary accounts that can be used to maintain statistical information for a variety of metrics.)
- Lists > Accounting > Accounts > New
- Populate Account Number
- Write in Account Name Ex: Headcount
- Fill in type “Statistical”
- Save
Step 3) Create a Saved Search Ex. Employee Search by Department.
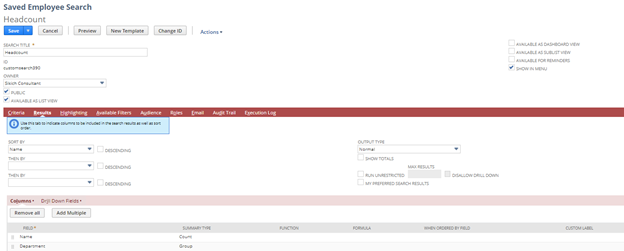
This saved search will need to calculate the correct amount of employees in each department, so we will have to add functionality that sums each employee per department.
- Reports > Saved Searches > All Saved Searches > New
- Employee Search
- Fill out the necessary header fields along with the correct check boxes
- Criteria – None (Unless you need to filter out certain employees)
- Results
- Field – Name
- Summary Type – Count
- Field – Department
- Summary Type – Group
- Save
- Field – Name

The final result will look like this:

Step 4) Create Statistical Schedule
- Transactions > Financial > Create Statistical Schedule
- Populate Statistical Account
- Populate Saved Search
- Validate Saved Search to ensure the count is populating
- Populate Frequency
- Populate Start date
- Save
Step 5) To test your schedule
- Select Statistical Schedule in “View Mode”
- Select “Create Journal Entry” button
Step 6) Review your Journal Entry.
When reviewing your journal entry, you want to make sure all of the necessary fields are populated.
- All of the header fields (Ex: Accounting period, date etc.)
- The correct Units of Measure
- All of the line fields being populated (Ex: Account, Amount, Memo, Department, Class etc)
Have any questions about how to create statistical schedules in NetSuite for expense allocations? Please contact us at any time.
This publication contains general information only and Sikich is not, by means of this publication, rendering accounting, business, financial, investment, legal, tax, or any other professional advice or services. This publication is not a substitute for such professional advice or services, nor should you use it as a basis for any decision, action or omission that may affect you or your business. Before making any decision, taking any action or omitting an action that may affect you or your business, you should consult a qualified professional advisor. In addition, this publication may contain certain content generated by an artificial intelligence (AI) language model. You acknowledge that Sikich shall not be responsible for any loss sustained by you or any person who relies on this publication.


