Securing your data and ensuring continuous availability of service in customer engagement apps (Dynamics 365 Sales, Dynamics 365 Customer Service, Dynamics 365 Field Service, Dynamics 365 Marketing, and Dynamics 365 Project Service Automation) are critical. There will be situations where it could be deleted or altered with no clue of how it was changed, but you’re going to want to recover that original information. That is where the backup and restore feature for environments in Dynamics 365 comes in and so much more!
To get started on this first thing first you will need to be logged in as System Admin or System Customizer credentials into Power Platform Admin Center.
Backing Up Data
Let’s begin with backing up data. There are two versions of doing so, which is system and manual.
System backup
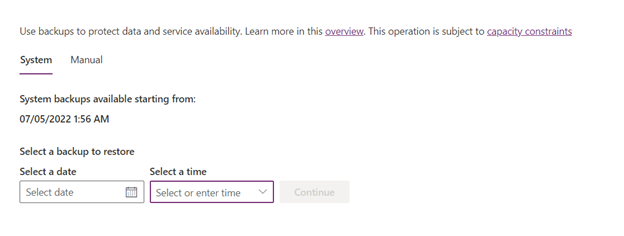
System backups occur continuously using the Azure SQL Database. These backups are generated 1 hour apart for 7 days, deleting the oldest record as that next hour goes by. You can access these backups by clicking into any environment and selecting this option here:

And from there you will have the option to select how far back you want to restore your data from. The system will tell how far you are allowed to go:
Manual backup
Now this version is more flexible because you control when the backup data is generated. When that backup data is saved, it is available to you for 30 days until it expires, unlike the system backup which is only 7 days.
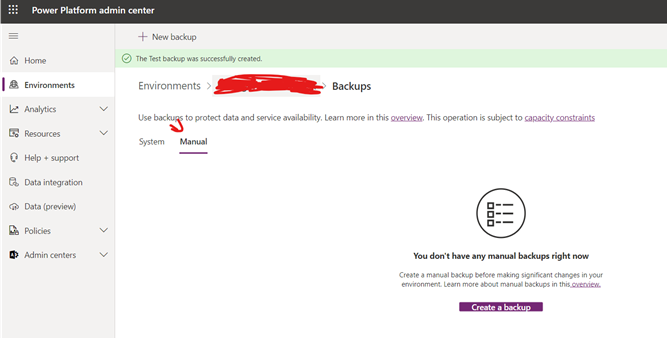
To create a manual backup, you’ll be following the same steps like restoring a system backup but will instead go the manual tab:
Restoring Data
When you have backups created for your environment, you can even use those backups to restore data in different environments. For example, if I have backup data in Environment A that was made July 1st at 8 AM, I can grab that data and have it restored in Environment B instead.
To do that:
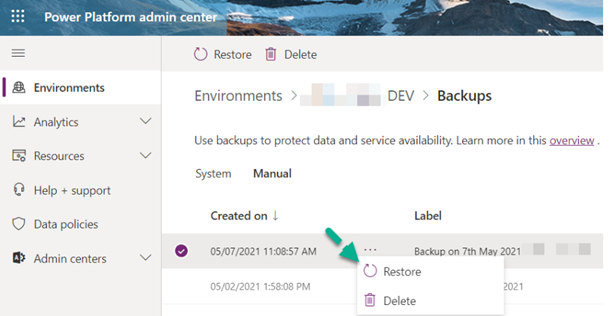
- Click that backup you want to restore and select the “Restore” option.
- Choose the Select environment to overwrite, and if you want to change the name of the Environment then edit the “Name” under “Edit details.”
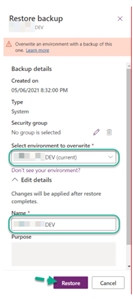
- Special Note: If you don’t see any environments to select, that means you don’t have any sandbox instances. You CANNOT perform this action on Production environments. The only way around this is converting your Production environment into a sandbox. I highly recommend you do such changes during off office hours.
- Once you click “Restore,” it will begin the process, which could take a considerable amount of time, depending upon how large that backup data is. You can find that information by looking in the “Environments” tab and finding the GB size next to the environment name.
- Once the process is done the environment will enter Administration mode automatically, which you will need to disable like so:
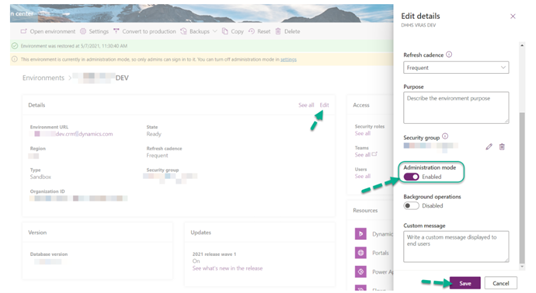
Once all that is said and done, the environment should be ready for use and function and have the data back at that exact time period of the backup data.
Have any questions about how to backup and restore data in Dynamics 365 environments? Please contact us at any time!
This publication contains general information only and Sikich is not, by means of this publication, rendering accounting, business, financial, investment, legal, tax, or any other professional advice or services. This publication is not a substitute for such professional advice or services, nor should you use it as a basis for any decision, action or omission that may affect you or your business. Before making any decision, taking any action or omitting an action that may affect you or your business, you should consult a qualified professional advisor. In addition, this publication may contain certain content generated by an artificial intelligence (AI) language model. You acknowledge that Sikich shall not be responsible for any loss sustained by you or any person who relies on this publication.


