This website uses cookies so that we can provide you with the best user experience possible. Cookie information is stored in your browser and performs functions such as recognising you when you return to our website and helping our team to understand which sections of the website you find most interesting and useful.
Creating a Custom Field That Uses Calculated Data from a Saved Search

Sometimes a business requirement demands that the data in a NetSuite custom field is not something that can be derived by sourcing or using a formula. You may need to provide a total of the quantity of all items on a sales order (or other transaction) or the number of lines on a sales order. This is data you can calculate by using a NetSuite saved search AND then create a custom field that pulls that search data into the field.
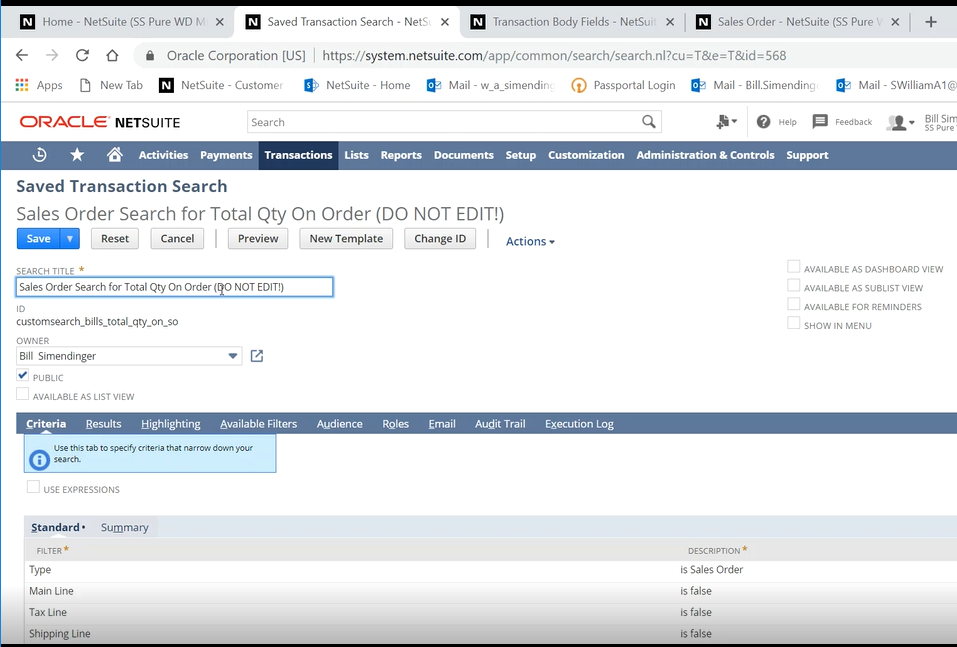
Begin by creating the Saved Search to supply the necessary calculated result. In our example, we will determine the total quantity of all items on a sales order. So, the Criteria tab of the saved search should include only sales orders and should exclude the main line, tax line and the shipping line. We only need sales order lines with actual items on them. This would also be true if we were trying to count the number of item lines on the sales order.
Criteria Tab:
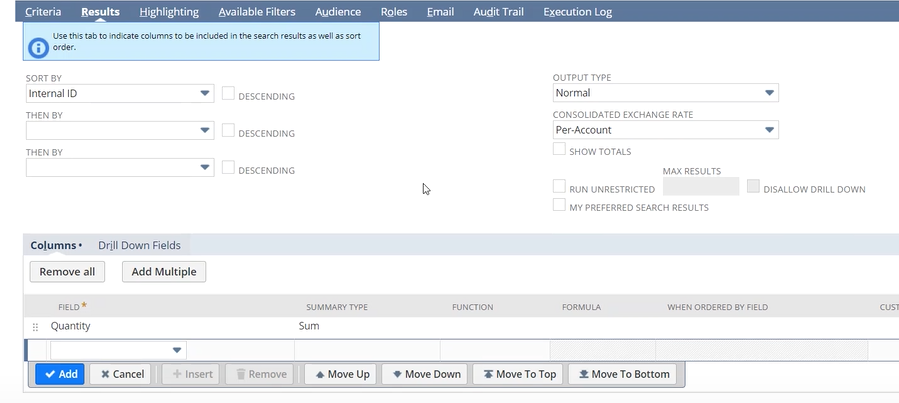
For our Results, we only need to include the field that we are calculating on. In this example, it’s the Quantity field. Once we choose the field, we will use SUM as our Summary Type. Other options we might need in addition to SUM would be Count, Average, Minimum or Maximum, depending on the business requirements. Normally in a Saved Search with a Summary Type field, we would also have at least one “Group By” field. In this situation, however, we don’t need to group by anything.
Results Tab:
The next thing we need to do is set a Filter on the Available Filters tab. This will allow the Saved Search and our custom field to be able to identify which data to return. In this example, we want to identify the sales order transaction we are viewing so we’ll use the Internal ID field. We don’t need to set “Show In Filter Region” or any other options here.
Available Filters Tab:

When we Save and Run the Saved Search, we see only one result, and it’s just a total of all quantities on all sales orders. Because the results will be limited in the custom field on our sales order transaction, we don’t need to limit results here, or filter out voided sales orders or other exclusions.
Returned results from running the saved search:

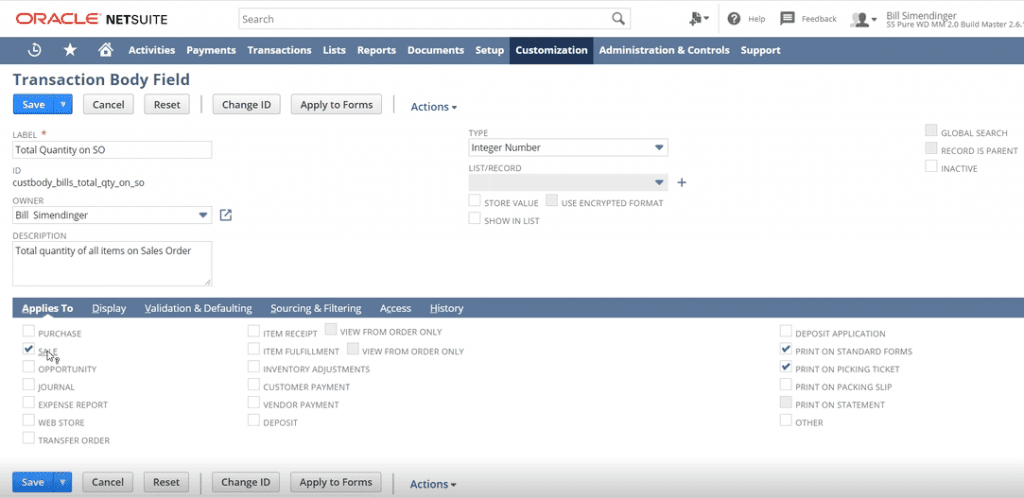
Our next step is to create the Custom Transaction Body Field. You can give it a name like “Total Quantity on SO” or whatever is appropriate. The Type of field in our example is an Integer Number, which doesn’t include decimals (but you could choose a different type if your quantities included decimals). We do NOT want the “Store Value” checkbox enabled. We need this field to always calculate the most recent value to be displayed.
Since this field is a Sales Order field, we check the Sale checkbox on the Applies To tab. In our example, I also want to be able to print this on the Sales Order Acknowledgement and the Picking Ticket so I checkmarked both of those options as well.
Custom Transaction Body Field screen:
On the “Validation & Defaulting” tab, we need to select our Saved Search in the Search drop-down. There is also another field called “Field” (below the Search field) that is used as an additional linking field, if needed. We don’t need to use that since we are using the Internal ID to link our sales order transaction to the Saved Search.
Validation & Defaulting tab:

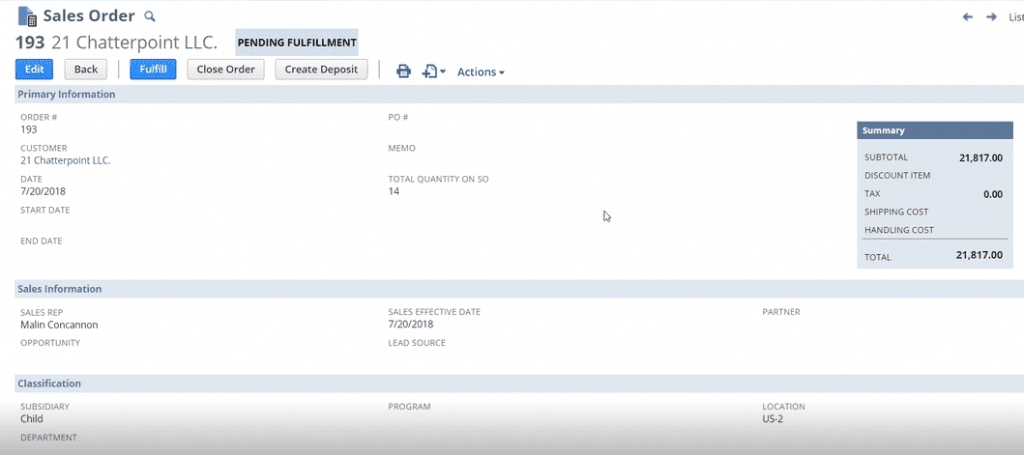
You can place the field where you like on the Sales Order form by customizing the form. In our example, I placed it in the main area of the Sales Order form. Our new field now shows the result of our saved search for this sales order. The total quantity of all items on this order is 14.
Sales Order screen:
When you click on the Printer button and choose to Print, the sales order acknowledgment that prints includes the Total Quantity of Items on Order at the bottom, where I placed it. You can edit the sales order printed form and choose where to print this field.
Printed Sales Order:

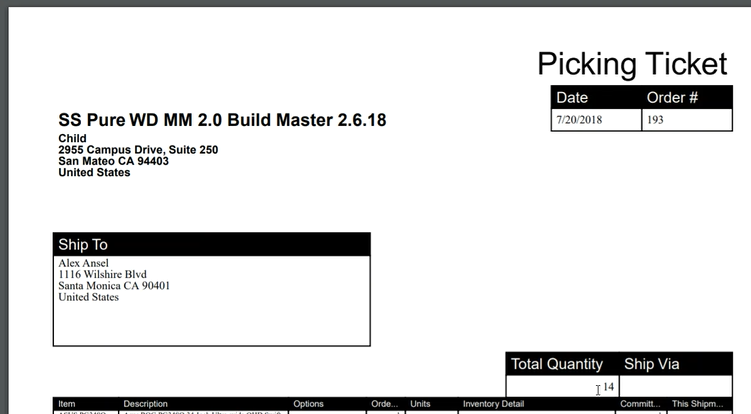
Clicking on Print and choosing Picking Ticket will print that document. Our custom field also prints on this document, at the top. You can edit and place it where you like as well.
Printed Picking Ticket:
So, in order to create a custom field and retrieve data from a saved search, you need to:
Create the saved search
- Criteria limits the data to what you need to include
- Results will have only one field and it will have a Summary Type assigned
- Available Filters will have a filter to link to the data, such as Internal ID
Create the custom field
- Don’t store the value
- Determine where you want the field displayed
- Choose the saved search as the source of the data
- Place the custom field on the necessary screen and printed forms.
Thanks for reading about how to create a custom field that uses calculated data from a saved search. If you’d like to learn more about this or anything else about NetSuite, please contact us at any time! You can also learn about more great tips for NetSuite on our YouTube playlist or our other blog posts.
This publication contains general information only and Sikich is not, by means of this publication, rendering accounting, business, financial, investment, legal, tax, or any other professional advice or services. This publication is not a substitute for such professional advice or services, nor should you use it as a basis for any decision, action or omission that may affect you or your business. Before making any decision, taking any action or omitting an action that may affect you or your business, you should consult a qualified professional advisor. In addition, this publication may contain certain content generated by an artificial intelligence (AI) language model. You acknowledge that Sikich shall not be responsible for any loss sustained by you or any person who relies on this publication.


