Containerization is a rather broad topic in Microsoft Dynamics 365 for Finance and Operations (D365FO”) and there are several ways to accomplish the process. The simplest of ways is to consider the Target License Plate as the “container,” and anything that gets picked for a Work ID is assigned to this target license plate value. A common process is to pick the material, and then let a user decide how an entire shipment (or part of a shipment) should be packaged for the best fit in a container. This process determines packaging after the pick is completed and is accomplished using a manual packing process.
In this post we’re going to walk through a somewhat unique but very useful Dynamics 365 containerization process that uses the Item setup to determine how an item should be packed. We’re going to start with an item that is stored and shipped in three units of measure.
- Each
- Case
- Pallet
When this product is sent out for picking, we want Pallet quantities to be automatically assigned a Container ID for each pallet to be picked. We want Case quantities to be picked similarly, as each case quantity should get its own Container ID. For each quantity, however, we want all of these packed together into a single container. And we want D365FO to tell us how all of this should be packaged without a manual packing process involved.
To accomplish this, all standard picking processing elements will need to be setup to allow you to create the sales order, work, and complete the pick of that work. We’re only going to focus on the key elements required to set up this scenario.
Container Types
You will need at least one value setup for a Container Type that will be the used for packing the Each units together.
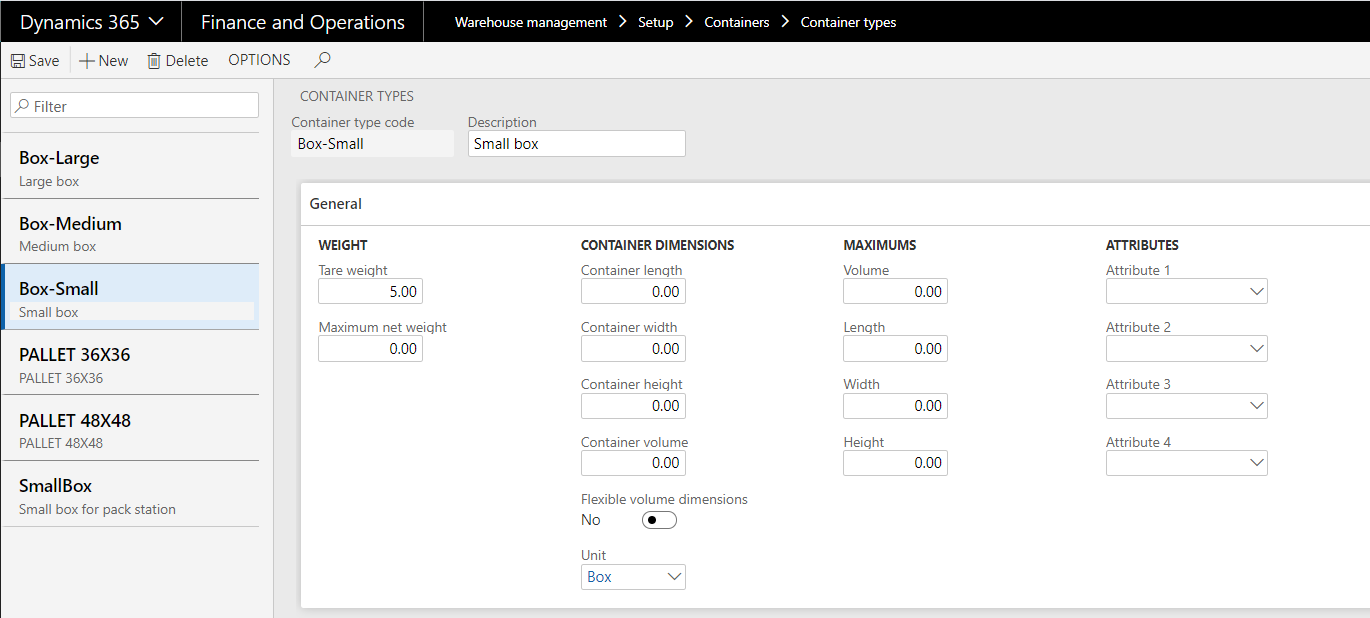
We will only be using a Small Box in this setup and will be ignoring setups for weights and volumes since anything below a Case quantity will fit into this box size, or will be represented by this setup.
Container Group ID
We will need one Container Group ID for this setup. It will be used to define a Container type for the containers created for any each units that get packed together in a single box.
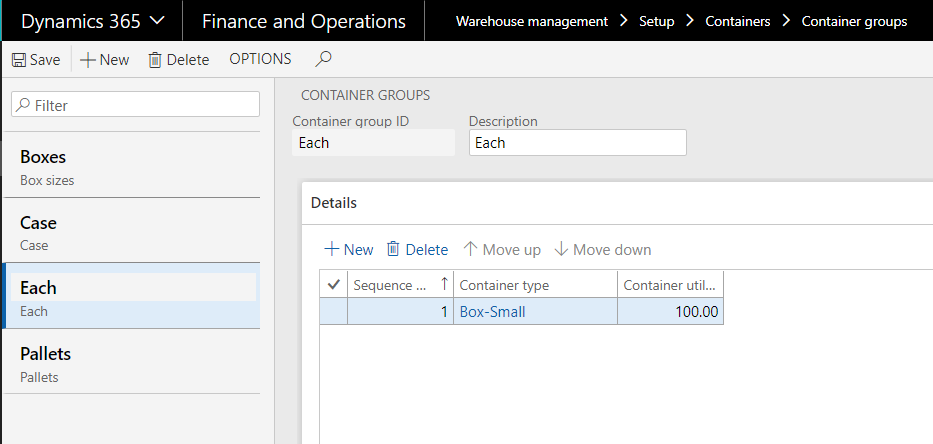
We only need to name this value and define a single sequence value for the Box size/name we want to use for these items, and since any larger quantities will be captured by the Pallet and Case setups, we do not need to have more than one sequence.
Item Setup
Next is the item setup with two key elements that must be setup to allow this process to occur.
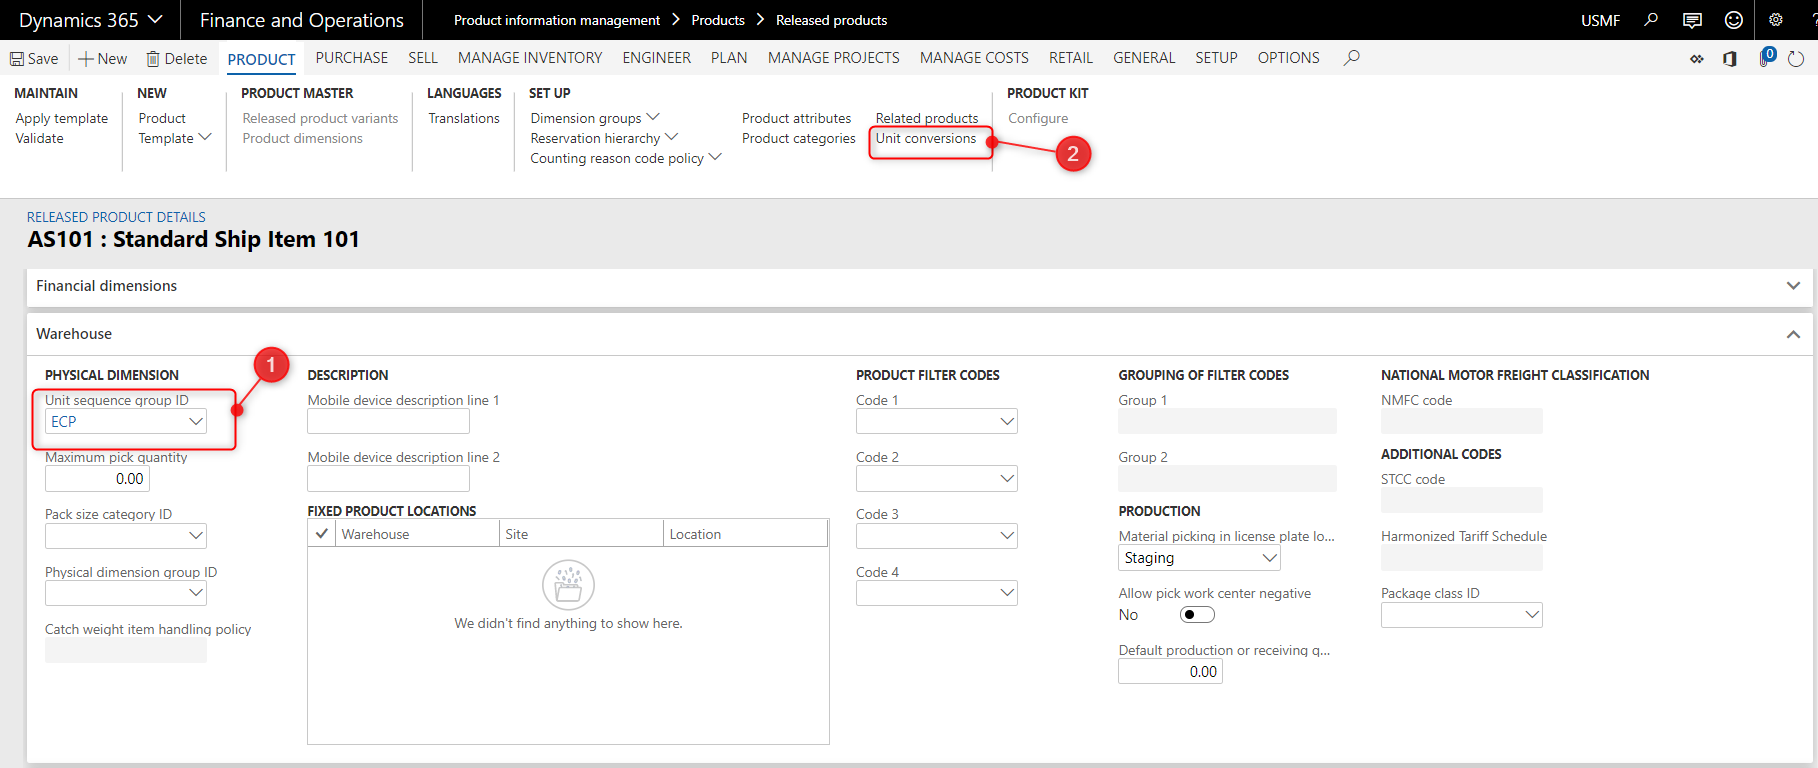
- A Unit Sequence Group must be applied to the Item for the Units in which you want to pick your product. This is where we’ll setup the “Pallet,” “Case,” and “each” values.
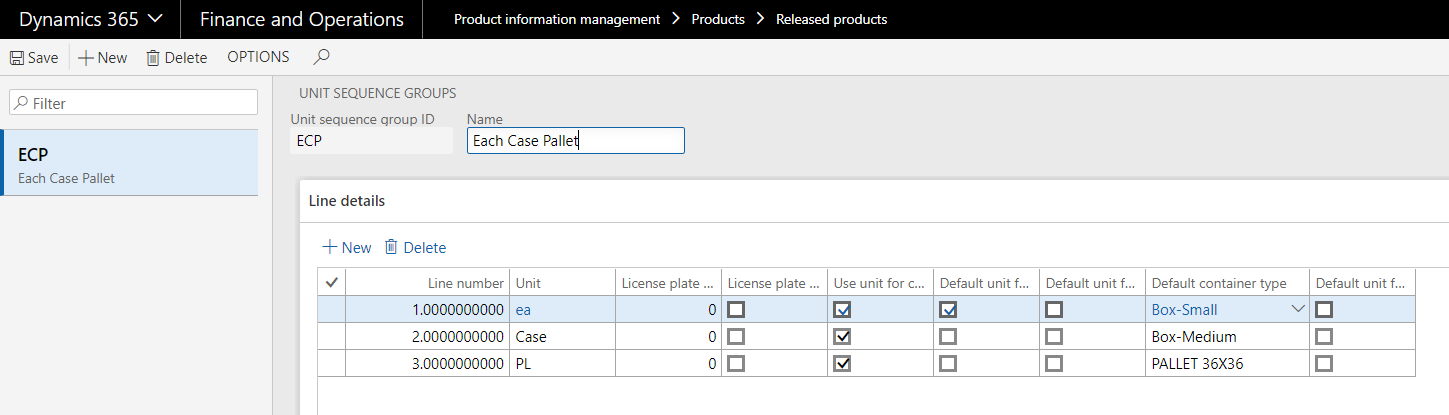

For my setup, I created a new group and defined the sequence from smallest container to largest. I’ve also assigned checkboxes to default units for Cycle Counts and Purchase Orders, but this is not necessary.
- All Unit Conversions should be setup for the product so that the system knows how many each units are in a Case and a Pallet.
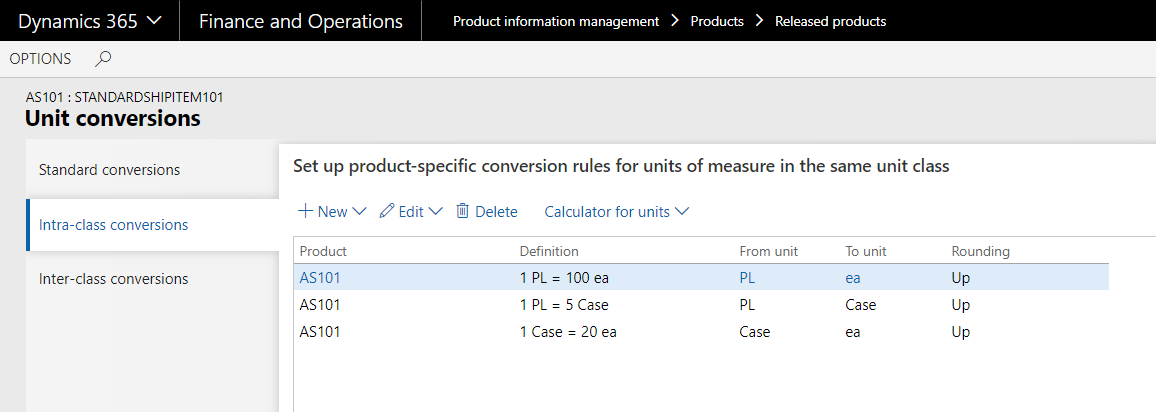

For this example, I will have 100 Eaches = 1 Pallet, and 20 Eaches = 1 Case.
This setup is required and will be used at time of Containerization to determine how many of each unit to look for that will make up a Pallet, and Case quantity of the product.
Once the product is fully setup and all standard required fields are applied, we are now ready to dive deeper into the setup.
Location Directives
The next required setup involves the Location Directives. These are required setup as it will split the Work by our three units of measure. It would also allow us to change where each quantity is picked from if inventory is stocked in different locations based whether a Pallet has been split apart or not. But this will not be done in this example.
Note: Really think this setup through along with the setup of the warehouse as you likely do not want a user directed to a full pallet of product if they only need to take one Each or Case as that would require them to break the pallet apart.
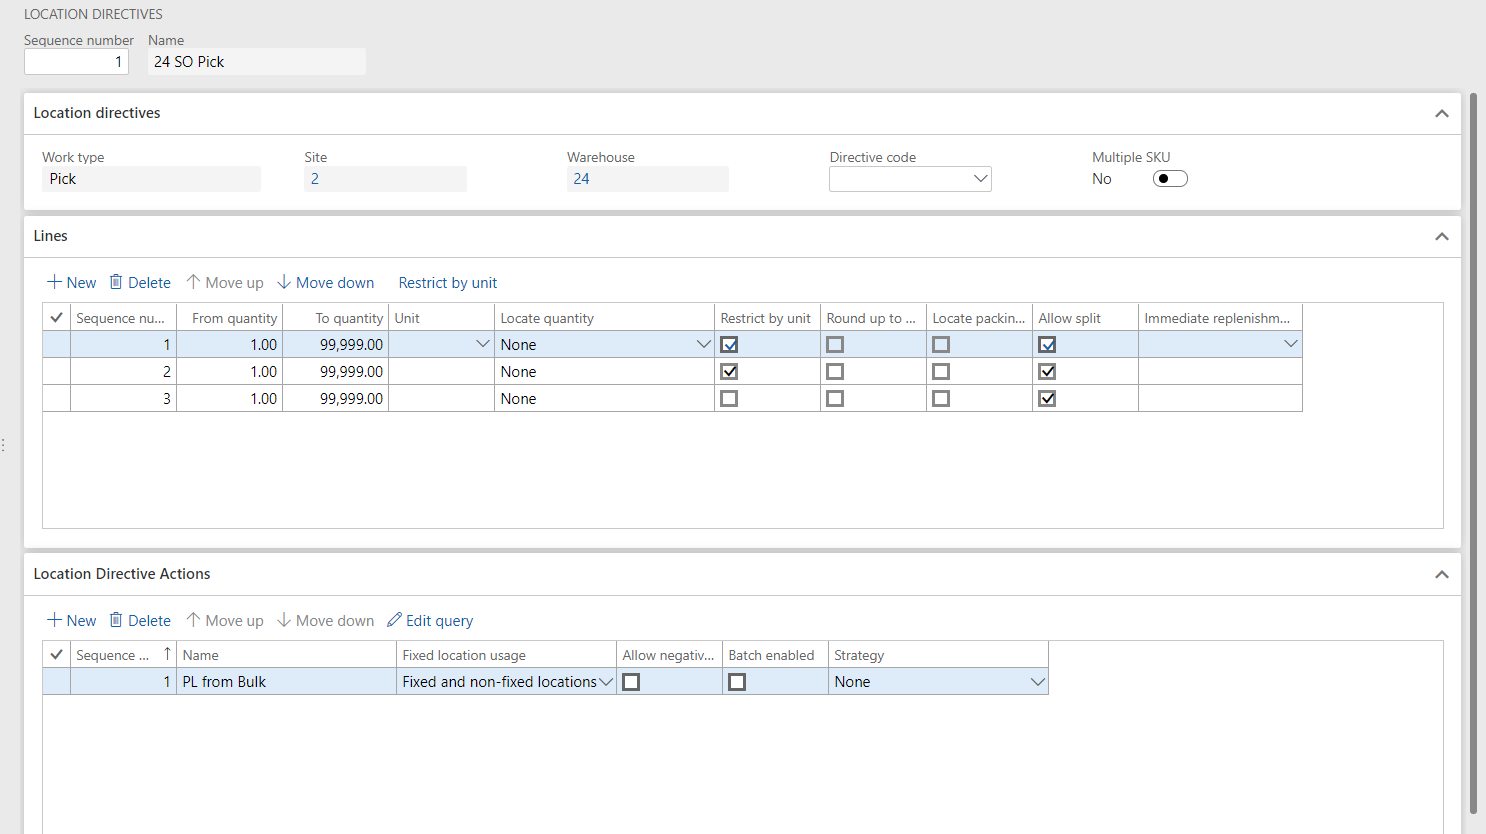
The location directives we care about is only the ones used for Work Types equal to “Pick.” And all setup should be created the same way as any directive that will be used to pick product for sales shipping. The big difference lies in the Lines section of the form. Here you will need to add multiple lines, one for each unit of measure to be picked. In my example above, Line Sequence #1 is setup for Pallets, #2 for Cases, and #3 for Eaches. The lines for Pallets and Cases (sequences 1 and 2) should be set to a value of “Yes” on the Restrict by Unit checkbox. And then under the button for Restrict By Unit, the Unit should be specified as follows:
- Sequence #1 = “PL”
- Sequence #2 = “Case”
Only one value per Directive Line is needed.

No restriction should be made for sequence #3 as this will be the line to pick all Each units together at once.
The actions still need to be defined for the lines, and this is where you will setup for each Unit of Measure, the location from which the Work will direct the pick. For my example these will all be set to allow picking from Bulk and Floor locations as all the product will be stored in a single floor location.
Container Build Templates
Now we will set up the Container Build Templates. These will control how the container numbers get assigned to the products and to which units.
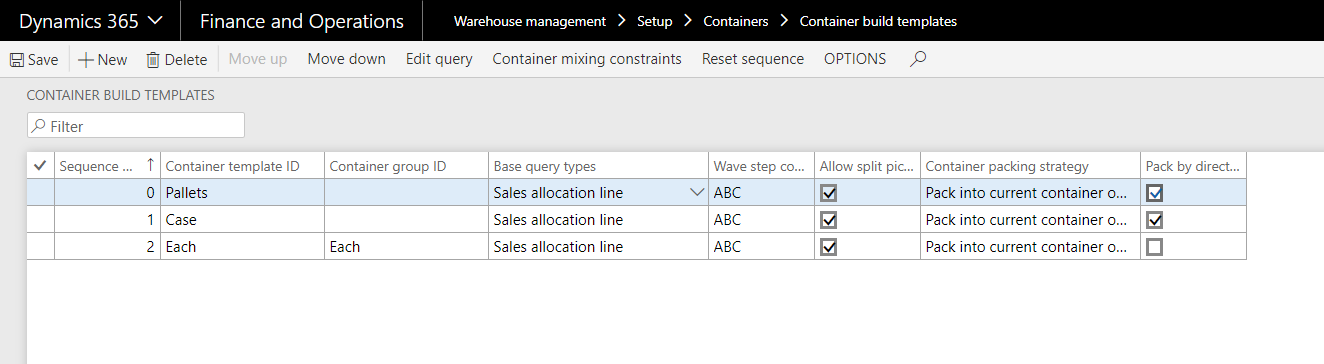
For this setup we will need three lines, one for the Pallet, Case, and Each values.
First create a line for the Pallets (sequence 0). Here we will specify the Template ID and set the Base Query Types to “Sales allocation line.”
Then set the following fields as indicated to allow for this type of processing.
- Wave Step Code field – Any unique value can be added here and will be used for all lines in this setup.
- This will be the tie between the Container Build Template and the Wave Template used later in the process.
- Allow Split Picks = “Yes”
- This is so that not all product must come from one location.
- Container Packing Strategy = “Pack into current container only”
- This will ensure that all the products do not get added to other containers.
- Pack by Directive Unit = “Yes”
- This is critical and is the setting that allows the Unit to represent the Container being picked.
We’ll next need to click the Edit Query button so that we can specify that this only applies to Pallet picks, not Cases or Eaches.
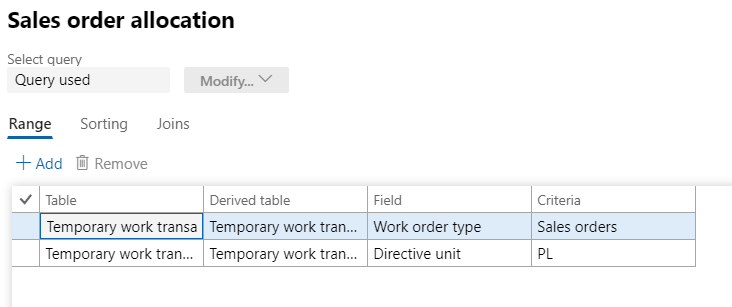
Add a filter line and set the Table to “Temporary work transactions” set the Field value to “Directive Unit” and set the Criteria to “PL” for pallets only.
Repeat the exact same setup for the Case unit, but of course set the Directive Unit on the Edit Query to only look for “Case” values next. This should be created as Sequence 1 or after the Pallet template.
Lastly, we’ll create a line for “Each” quantities, and this will be almost identical, but a couple fields will make it slightly different. For this one, we will not check the Pack by Directive Unit checkbox since we want all Each quantities packed together, and we add the Container Group created early in this document for the small box container. No Query needs to be added for this line as it will essentially catch all the remaining quantities which in our case will only be Each units of measure.
Wave Templates
The last of the critical setups we’ll cover are Wave Templates. A wave template should be created for your scenario and warehouse, and all other settings and grouping can use standard setups and information. The one field that we need to make sure is set correctly is in the Methods.
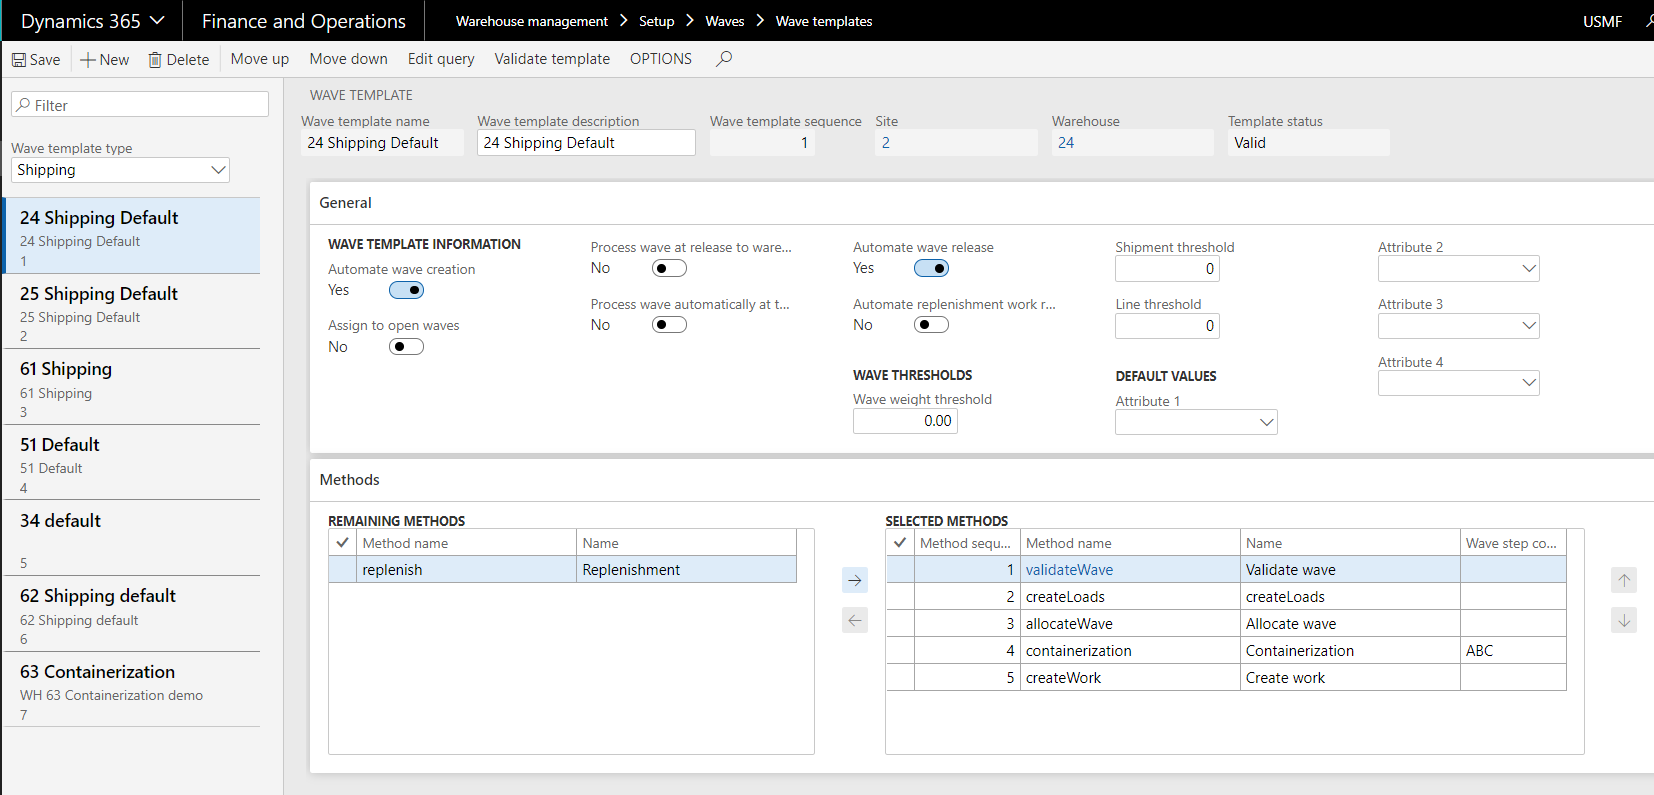
The Remaining Method name of “containerization” needs to be added to the Selected Methods side of the form using the arrow button. Don’t worry about placing it in the sequence of methods as it will be automatically placed for you. After moving it to the Selected Methods, a Wave Step Code value should be entered and needs to match exactly the Wave Step Code added on each Container Build Template record.
Once this is completed, we’re all ready to begin testing the new setup.
Containerization Example Processing
The first step for the example is to create a sales order for the item being sold.
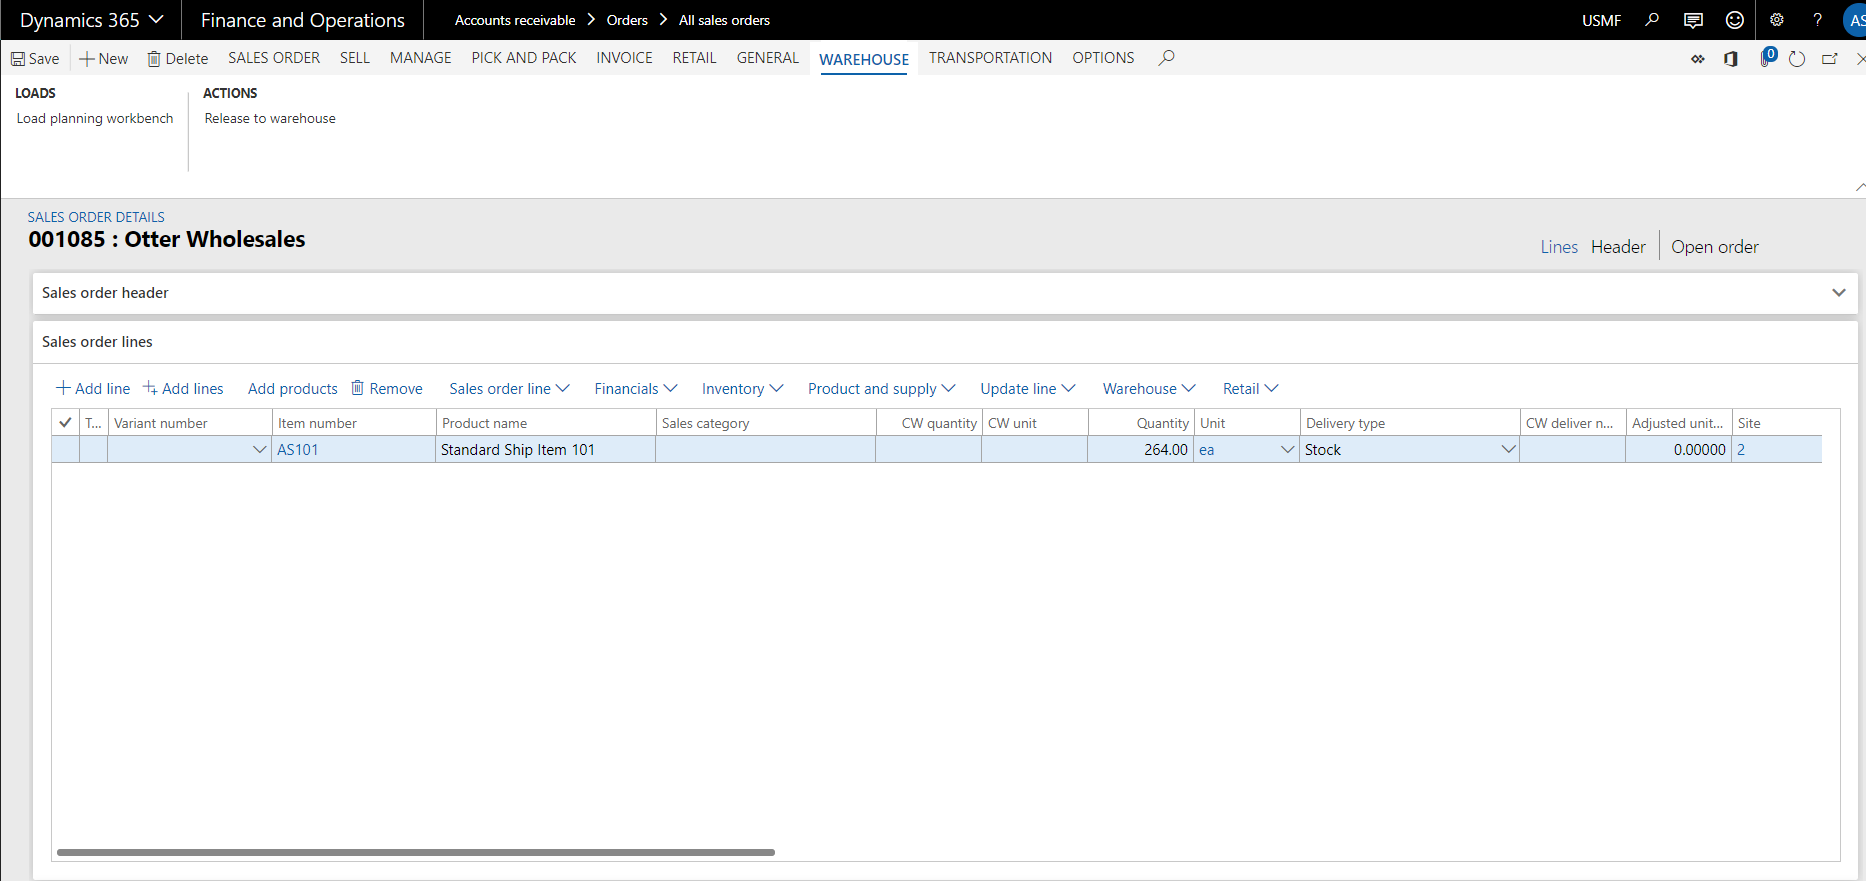
Create a sales order with no special setups and add the item created or updated during the setup. Make sure to enter a quantity value that is large enough to have multiple Pallets, Cases, and Eaches picked and shipped for the order. And now would also be a good time to make sure you have enough inventory on-hand and in pickable locations.
For my example I’m going to ship 264 Eaches of this product, which based on the setup should give us 2 Pallets, 3 Cases, and 4 single Each products packed together in one container during the pick.
Next, I’m going to release the sales order to the warehouse for shipping. It doesn’t matter at this point what method you use, or even if you auto-process your waves, if the correct Wave Template is used for the Shipment you create from this sales order, the result should be the same.
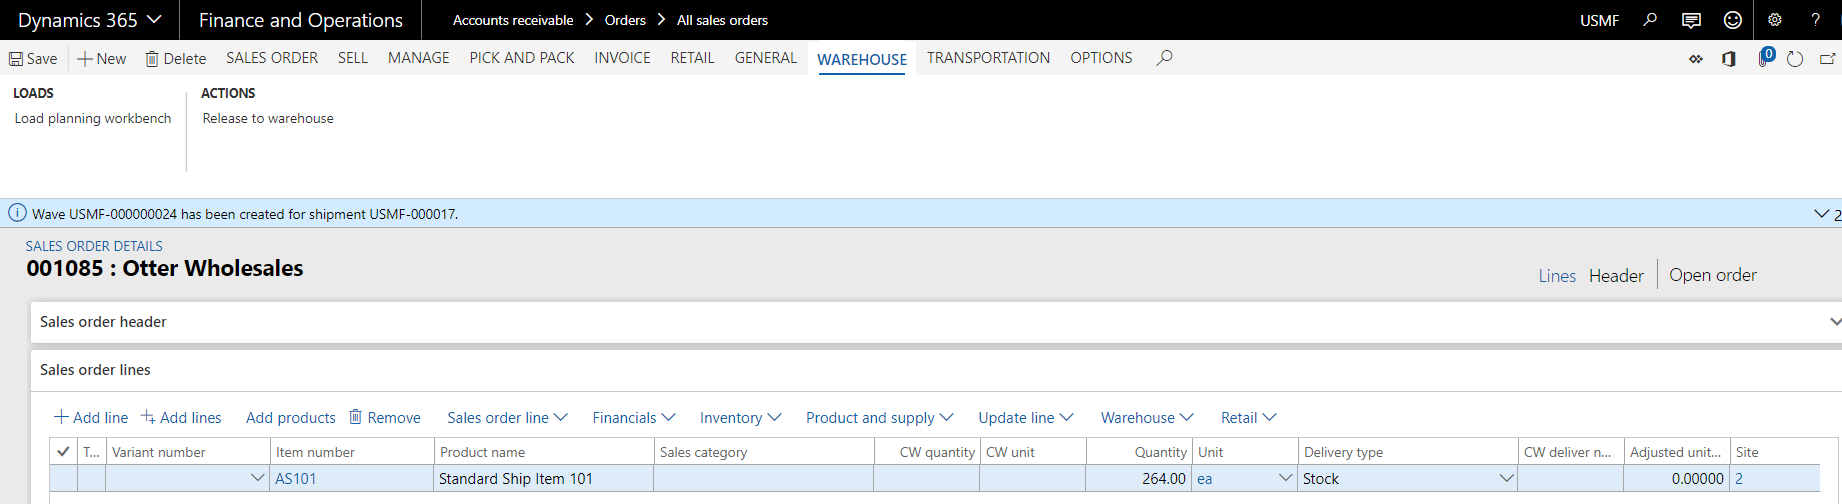
After Releasing to the Warehouse, the Shipment is added to the Wave. If your process calls for this to be done manually, complete those steps until the Wave is created and the Shipment is assigned to it.
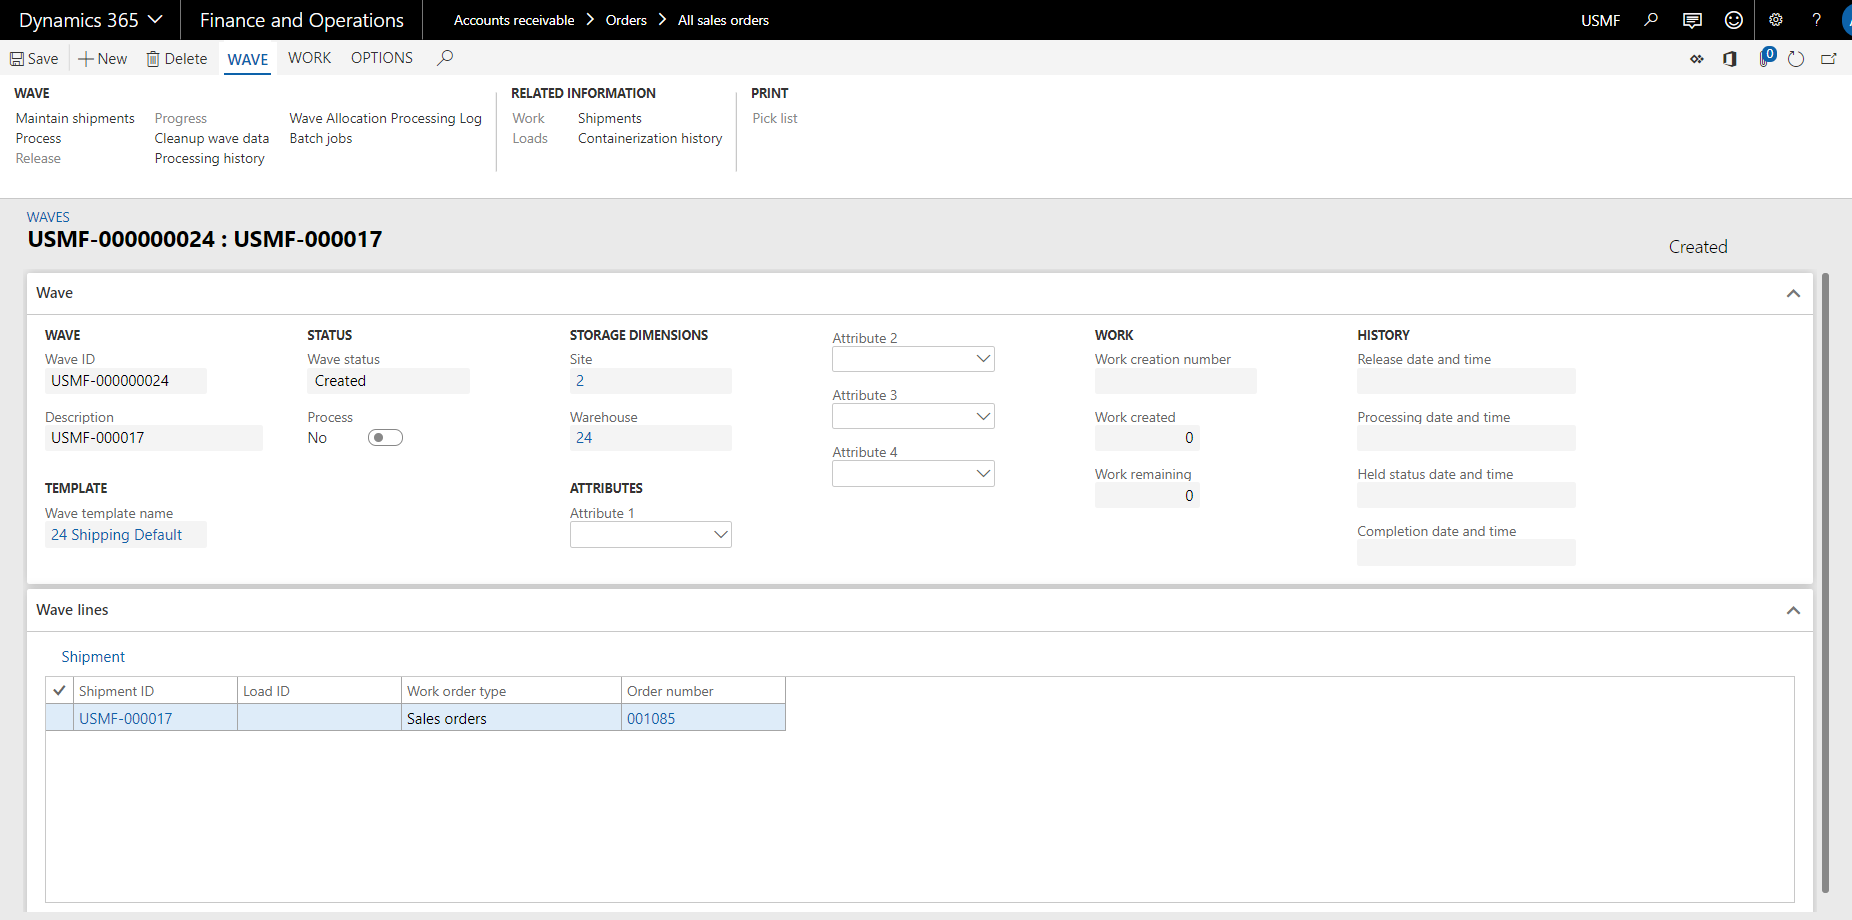
Once the Shipment is added to the Wave, all that is left is to click Process to create Work for this Wave. During the processing is when the containerization will be completed, and after it completes you can view the Containerization History to see exactly what Container Build Templates were used to process your wave and create containerization.
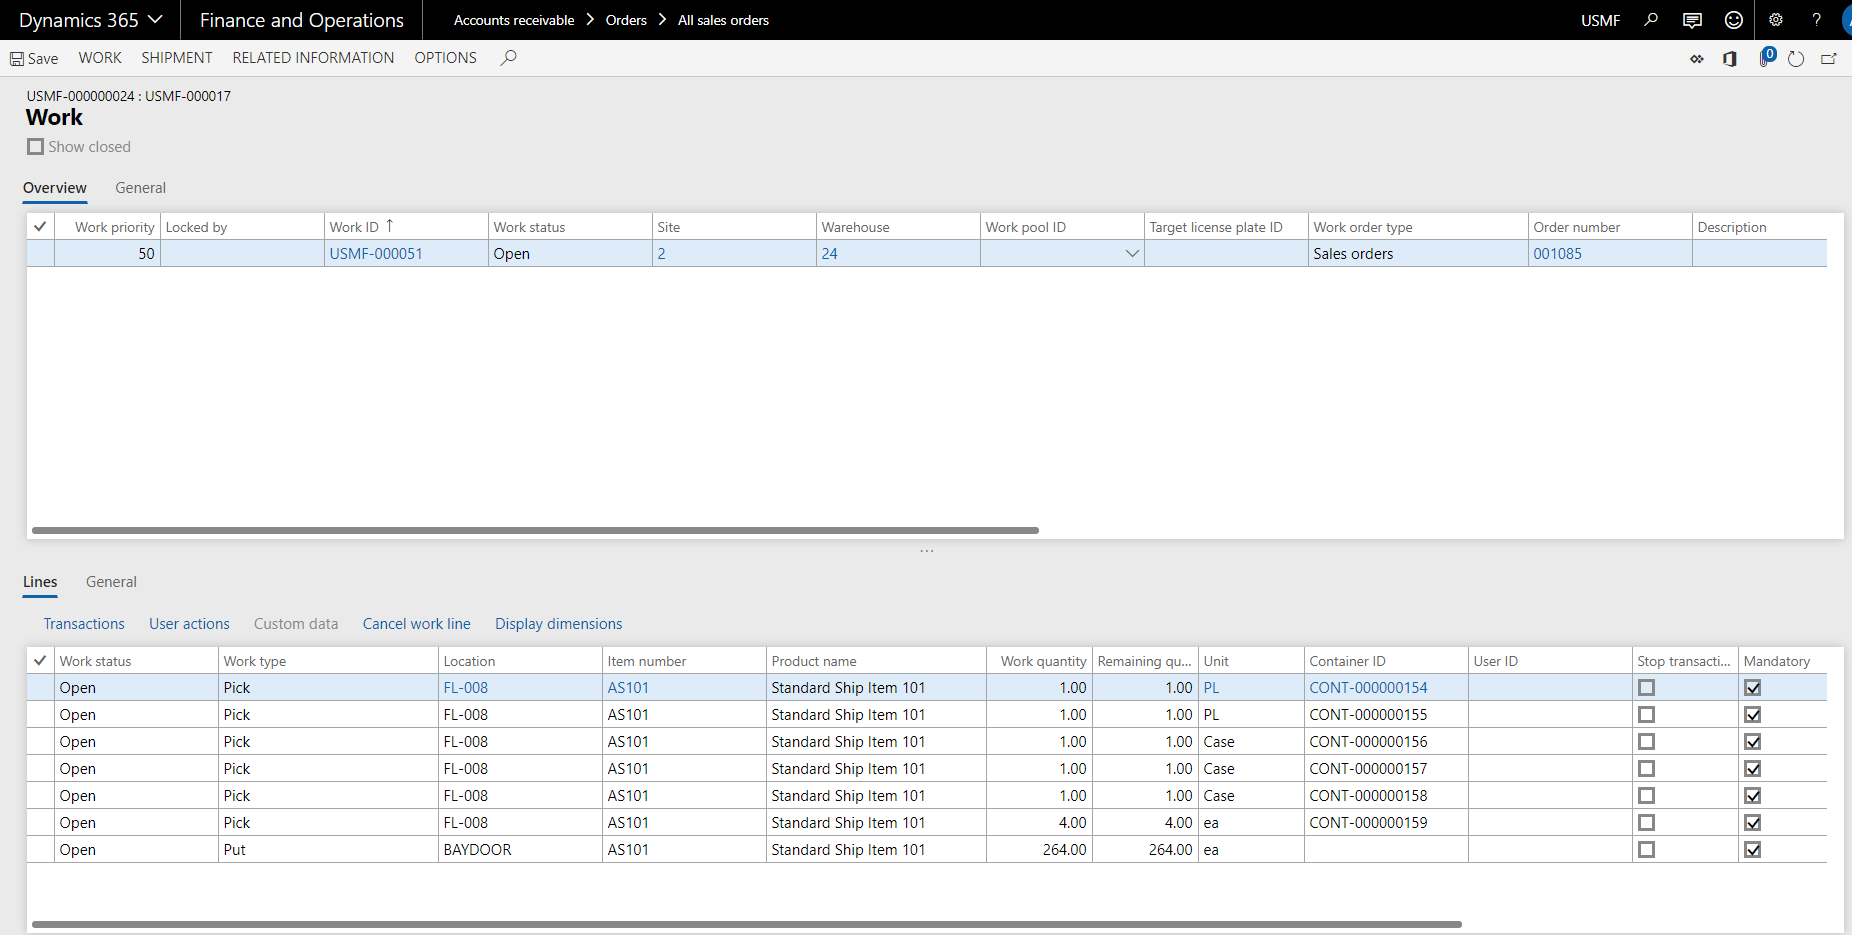
Once Processing is complete, click the Work button under Related Information to view the Work. Just as hoped, we have two pick lines for each of the Pallet quantities, three pick lines for each of the Cases, and a single line for the remaining Each quantity.
The Work is now ready to be sent to the Warehouse worker for picking.
Dynamics 365 Containerization Additional Thoughts
You may also want to set up the Work Templates to sort the work by units, so you’re directed to pick Pallets first, then Cases, and so on.
You may also want to use the Work Templates to split the work up so a user never has to pick more than a full pallet on a Work ID, and this could be accomplished via the Work Header Breaks functionality of the Work Template. This way an employee (forklift driver) could be responsible for just picking pallets, and another employee could pick Cases and Eaches quantities.
If the goal is to create work and have that work picked and delivered to a dock location for shipping as quickly as possible. A setup could be used where the Waves are automatically processed, and Work is created. Then a System grouping or System directed Mobile Device Menu Item could be used to immediately allow a user to start picking the items. The items will then be delivered to the outbound location ready for shipping.
Have any questions about Dynamics 365 containerization? Please contact our D365FO experts at any time!