Salesforce has officially announced the End of Support for Workflow Rules and Process Builder, effective at the end of 2025. Administrators and developers must transition their automation processes to Salesforce Flow, the platform’s next-generation tool for scalable and efficient automation.
The ability to create new Workflow Rules and Process Builders in Salesforce orgs has already been removed, and while existing Workflow Rules and Process Builders may continue functioning post-2025, Salesforce will no longer support them. This guide is designed to help you understand the impact of this transition and provide actionable steps for a seamless migration to Salesforce Flow.
Are you impacted?
To determine if your organization is affected by this change, begin by identifying unmanaged Workflow Rules and Process Builders within your Salesforce org. These automations are created and maintained internally, unlike managed automations controlled by external vendors.
Identifying Unmanaged Workflow Rules
- Navigate to Setup and type “Workflow Rules” in the Quick Find box.
- Review active and inactive rules. Custom unmanaged rules can be distinguished from managed package rules by the absence of an arrow icon in the Rule Name column. (More on why this distinction matters in a moment.)

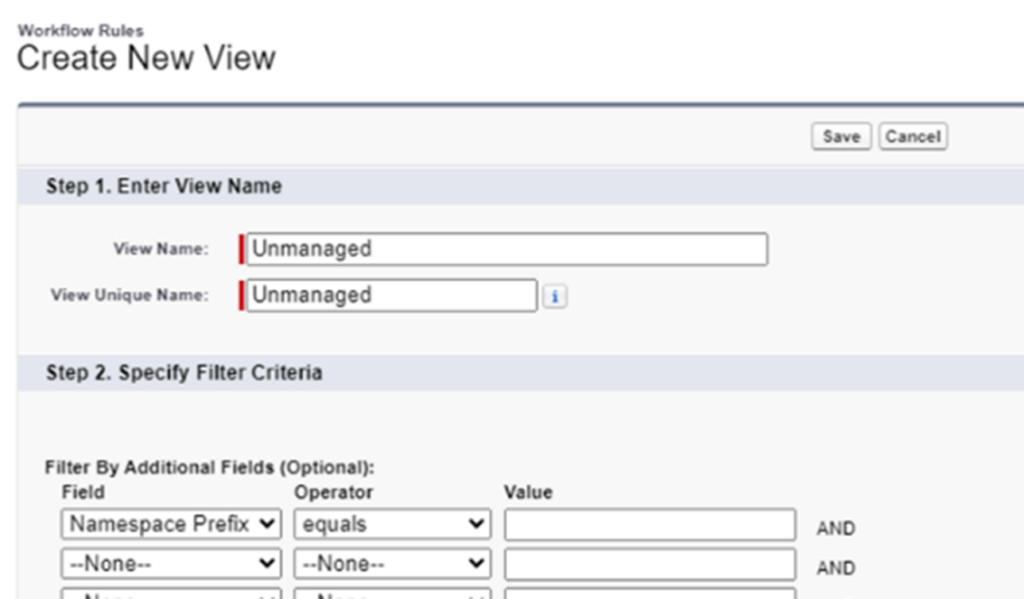
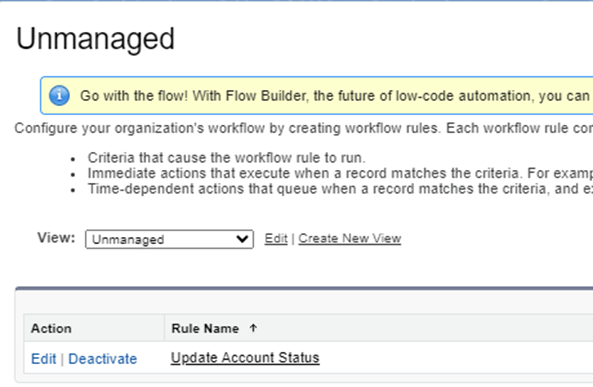
- For orgs with numerous rules, create a custom list view with the following filter:
- Field: Namespace Prefix
- Operator: Equals
- Value: (leave blank)

This filter excludes managed rules, allowing you to focus solely on unmanaged items requiring action.

Identifying Unmanaged Process Builders
- In Setup, type “Process Builder” and review the list of processes.
- Expand the versions for each process. If the version number is clickable, it is unmanaged and needs review. Non-clickable versions indicate managed processes.


Managed Automations
Workflow Rules and Process Builders within managed packages are updated and maintained by the package vendor; therefore, they cannot be directly edited by administrators. Salesforce has noted that vendors will be responsible for updating their automations and transitioning them to Flow Builder as Workflow Rules and Process Builders approach the end of support. This means that your ability to modify or convert these automations is limited, so collaboration with the package vendor is crucial.
To ensure seamless functionality post-2025, it’s essential to:
- Collaborate with vendors to confirm their migration plans to Flow Builder.
- Regularly check the AppExchange listing or vendor support portals for release notes, documentation, or updates about Flow migrations.
- Encourage vendors to provide updated package versions well ahead of the deprecation deadline.
Proactive communication with vendors minimizes disruption and ensures continuity in service. Many vendors are already working on this migration.
Getting Started with Migration
Review Existing Automations
Now that you have identified which processes within your org are affected, take the time to review and optimize existing automations. This is a good time to consolidate and eliminate unused or antiquated processes. Ask yourself the following key questions.
Are these automations still relevant to current business processes? For example, if you have a workflow rule that sends an email on a field update, are those emails helpful or are users deleting them as soon as they receive them?
Are notifications being sent to the right stakeholders? Are the users who receive them still in the same roles they were in when the rule was created?
Can any outdated or redundant processes be consolidated or eliminated? Often, business needs change as an organization matures, and its automations are no exception.
A thorough audit ensures that your automation ecosystem evolves in alignment with organizational goals.
Your Options for Streamlining Your Salesforce Automation Migration
Once you’ve identified the need to migrate your existing automations, the next step is selecting the most effective migration method. Broadly, there are two approaches: Salesforce’s standard Migrate to Flow tool or a custom-built migration process using the process builders and workflow rules as a guide. Each comes with distinct advantages and limitations, and understanding these nuances will help you make an informed decision.
Option 1: Salesforce’s Migrate to Flow Tool
The Migrate to Flow tool simplifies the transition of Workflow Rules and Process Builders into Salesforce Flows. This method is designed for ease of use, offering a straightforward conversion process with minimal setup. For organizations with a limited number of simple automations per object, this tool can significantly reduce the complexity and time required to migrate.
Advantages of Migrate to Flow:
- Low Barrier to Entry: With just a few clicks, you can migrate Workflow Rules or Process Builders, test the converted flows, and activate them with relative confidence.
- Simplicity: Ideal for smaller automation setups, this approach is efficient for organizations with uncomplicated workflows.
Limitations of Migrate to Flow:
- One-to-One Conversion: Each Workflow Rule or Process Builder is converted into a flow. While functional, this approach may lead to an inefficient proliferation of record-triggered flows. Salesforce best practices recommend consolidating flows to no more than three per object (Before Save, After Save, Before Delete). For instance, five Account Workflow Rules converted using this tool will result in five separate flows, whereas a manual approach could consolidate them into one or two.
- Feature Gaps: The tool does not support all actions and flow configurations, such as rules involving record types, fields on related records, or multiple currencies. Additionally, automations with multiple schedule options require separate flows for each time-based action. See the Resources section below for a full list of actions and flow configurations that are unavailable with Salesforce’s Migrate to Flow tool.
- Additional Configuration Required: Even after using the Migrate to Flow tool, you may need further adjustments to ensure the converted flows meet your specific requirements.
Option 2: Custom-Built Flows
An alternative to using the Migrate to Flow tool, and Sikich’s preferred approach, is designing and building flows manually. This approach offers great flexibility, allowing you to consolidate automations, optimize execution order, and overcome the tool’s inherent limitations. Your thorough review of existing business processes from earlier will pay off in this step.
Advantages of Custom-Built Flows:
- Streamlined Design: By mapping out your Workflow Rules and Process Builders, you can consolidate them into a smaller number of efficient flows, adhering to Salesforce best practices.
- Full Customization: Unlike the Migrate to Flow tool, this method is not constrained by exclusions or limitations. It empowers you to incorporate new business needs and refine existing automations during the migration process.
Challenges of Custom-Built Flows:
- Greater Time Investment: This method requires thorough planning and development. Especially when combining multiple workflows rules or process builders, you’ll need to carefully map out the execution order of actions and ensure a thorough understanding of your business processes.
- Complexity: Consolidating multiple Workflow Rules or Process Builders into a unified flow demands strategic foresight and precise execution.
Despite these challenges, the custom-built approach is the preferred method for achieving a robust and scalable automation framework. By combining migration with a comprehensive review of your business processes, you can eliminate redundancies, enhance efficiency, and position your organization for long-term success.
At Sikich, we advocate for this tailored approach to ensure your automations not only meet current needs but are also future-proofed for evolving business demands.
Executing a Successful Migration with Salesforce’s Migrate to Flow Tool
For organizations choosing to leverage Salesforce’s Migrate to Flow tool, adhering to a structured approach ensures a seamless and efficient migration. Below is a step-by-step guide to executing this process effectively.
Step 1: Prepare a Sandbox Environment
Begin by creating a sandbox environment. Testing in a sandbox is a fundamental best practice, as it allows you to validate your changes without disrupting production systems or impacting end users.
Step 2: Access the Migrate to Flow Tool
Once in the sandbox, navigate to Setup and search for Migrate to Flow in the Quick Find bar. The tool will display a comprehensive list of existing Process Builders and Workflow Rules by name, including their Type, Object, and Status. The Resulting Flow column (empty at this point) will populate once the migration is complete.
Identify the automation you want to migrate by selecting the corresponding radio button, then click the Migrate to Flow button in the top-right corner.
Step 3: Select Components for Migration
A dialog box will appear showing the components of the selected Process Builder or Workflow Rule. For Process Builders, the tool displays the nodes of the process as checkboxes. Carefully review and select the components to be included in the new flow. Once you’ve finalized your selection(s), click Migrate to Flow again to initiate the migration.


Step 4: Review the Migration Outcome
Upon completion, the tool will display one of two outcomes:
- Success: A summary screen provides details about the newly created flow.
- Error: If an error occurs, it typically indicates that the Process Builder or Workflow Rule contains unsupported actions or configurations. In such cases, you will need to switch to a custom migration strategy.
Step 5: Test the Migrated Flow
If the migration is successful, the next step is testing. Use the Debug feature within Flow Builder to validate the functionality of the new flow. Ensure that all actions and conditions mirror the behavior of the original Process Builder or Workflow Rule.
Step 6: Transition to Production
Once the flow performs as expected during testing:
- Activate the Flow: Transition the flow from draft to active status.
- Deactivate Legacy Automations: Deactivate the original Process Builder or Workflow Rule to avoid redundancy or conflicts.
- Test in Sandbox: Continue testing the flow directly from the interface, ensuring comprehensive coverage across all use cases.
Step 7: Deploy to Production
After thorough testing, deploy the new flow to your production environment using a change set. Once the flow is active in production, officially deactivate the corresponding Process Builder or Workflow Rule.
Key Considerations
Migration is not simply a technical task; it’s an opportunity to evaluate and refine your business processes. While the Migrate to Flow tool simplifies migration, its limitations may necessitate custom solutions for complex scenarios. By following this systematic approach, you can achieve a smooth migration with minimal disruption, ensuring your automations are optimized for Salesforce’s powerful Flow framework.
Custom Conversion: Elevating Salesforce Automations with a Strategic Approach
For organizations looking to avoid the limitations of the standard Migrate to Flow tool, custom conversion offers a way to reimagine and optimize automations as you migrate from Workflow Rules and Process Builders to Salesforce Flow. This approach focuses on creating a streamlined, scalable, and maintainable framework that fully leverages Salesforce Flow’s advanced capabilities.
Create a Comprehensive Inventory
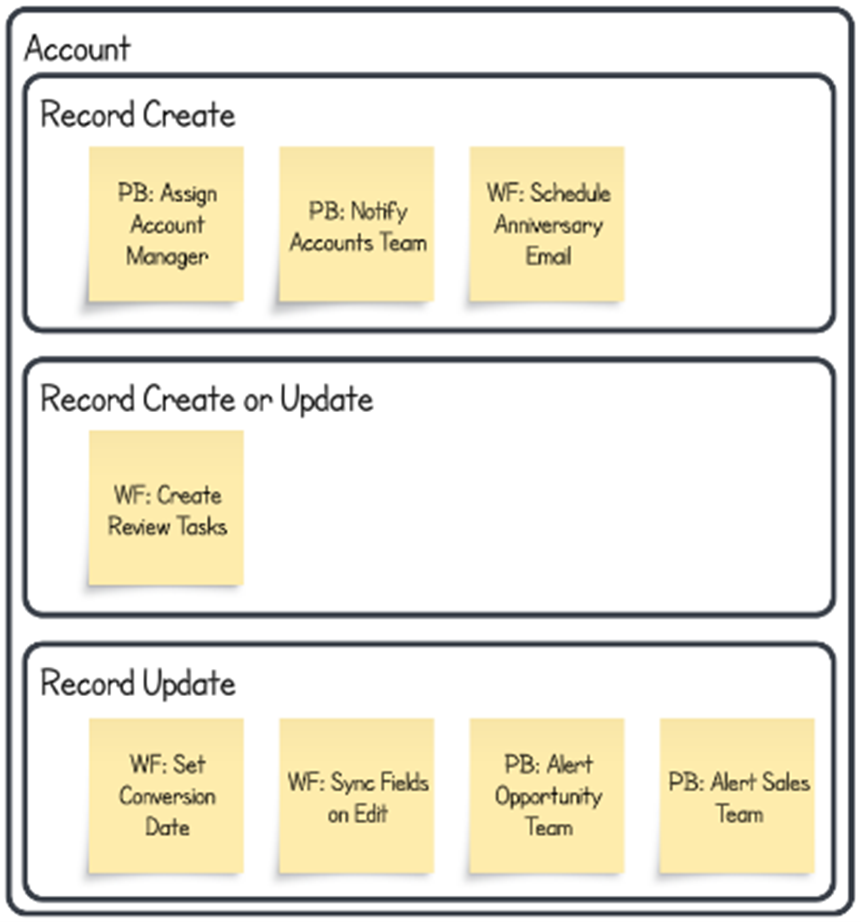
A successful custom conversion begins with the crucial step of creating a detailed inventory of all existing automations, categorized by object and trigger type. This analysis offers a clear understanding of the current state of your automations, identifies redundancies, and sets the stage for reimagining a more powerful Flow-based solution.
Here is an example of an organized inventory of your current automated processes:

This inventory acts as the foundation for a systematic conversion plan, ensuring no critical automation is overlooked.
Best Practices for Custom Conversion
When transitioning to Salesforce Flow, these key strategies will help you design an efficient and future-proof automation system:
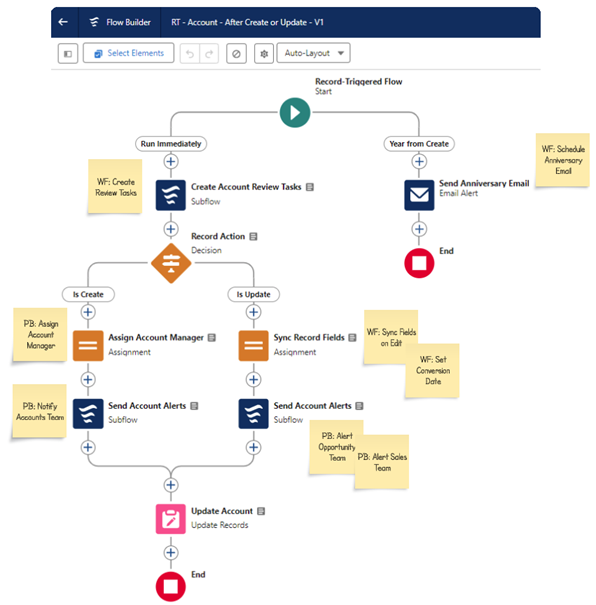
- Reuse Existing Email Alerts (Example: Send Anniversary Email)
Email Alerts are commonly used in Workflow Rules and Process Builders, and Salesforce makes it easy to carry these over to your new flows. Instead of creating new alerts, you can integrate these existing Email Alerts directly into your flows. This saves time and ensures consistency in your organization’s communications. - Leverage Sub-Flows for Unique Processes (Example: Create Account Review Tasks)
When automating complex processes, it’s best to keep your main triggered flow as clean as possible. Identify unique processes within each automation and move them into sub-flows. Keeping specialized logic in separate sub-flows enhances readability, improves maintainability, and isolates complex logic, making updates and debugging more efficient. - Consolidate Repeated Processes into Reusable Sub-Flows (Example: Send Account Alerts)
Many organizations have similar processes across different automations, such as creating tasks, sending emails, or updating records. Identify any recurring logic in your existing Workflow Rules and Process Builders and create reusable sub-flows to handle these actions. By doing so, you reduce redundancy, simplify updates, and enforce consistency across your automation framework. This modular design also improves scalability as your organization’s needs evolve. - Employ Time-Triggered Branches for Delayed Actions (Example: Send Follow-Up Email After X Days)
For Workflow Rules and Process Builders that use time delays, Flow offers a more advanced and flexible approach with time-triggered branches. These branches allow you to define conditions for actions that need to happen after a certain delay. By using time-triggered branches, you can better manage complex, time-sensitive workflows without creating separate automations or unnecessarily duplicating logic.
Visualizing the Transition
Below is an example of what a reimagined automation might look like when following these principles. Sub-flows handle specialized logic, reusable flows streamline recurring actions, and time-triggered branches enhance the handling of delays, resulting in a cleaner, more effective design.

The Result: A Robust Automation Framework
By adhering to these best practices, custom conversion not only ensures a smooth migration but also positions your organization for long-term success. The result is an elevated automation strategy that is more refined, efficient, maintainable, and leverages the full potential of Salesforce Flow to drive operational excellence.
We’re Here to Help
Transitioning from Salesforce Workflow Rules and Process Builder to Salesforce Flow is not just a necessity due to the end of support, but also an opportunity to enhance your automation processes. By migrating to Salesforce Flow, you can leverage its advanced capabilities to create more efficient, scalable, and maintainable automations that align with your evolving business needs.
Don’t navigate this transition alone. Our team of experts is here to help you every step of the way. Whether you need assistance with planning, executing the migration, or optimizing your new flows, we have the knowledge and experience to ensure a seamless and successful transition. Reach out to us today and let us help you future-proof your Salesforce automation strategy.
Let’s make this transition smooth and beneficial for your organization. Contact us now to get started.
This publication contains general information only and Sikich is not, by means of this publication, rendering accounting, business, financial, investment, legal, tax, or any other professional advice or services. This publication is not a substitute for such professional advice or services, nor should you use it as a basis for any decision, action or omission that may affect you or your business. Before making any decision, taking any action or omitting an action that may affect you or your business, you should consult a qualified professional advisor. In addition, this publication may contain certain content generated by an artificial intelligence (AI) language model. You acknowledge that Sikich shall not be responsible for any loss sustained by you or any person who relies on this publication.


